
Orchestral Combos with EWQLSO
by Piotr Musiał
Note: This tutorial was made using Cubase 4 Studio and Kontakt 3
Hi. My name is Piotr Musiał and I welcome You to my next tutorial!
Being quite intrigued with an idea of orchestral combos or full ensemble patches, that we can hear in the new, already famous library from ProjectSam – Symphobia, I thought it would be cool if we could do something similar with EWQLSO library. Who wouldn't want this kind of marcato sound in their sound arsenal?
I don't quite like the original ensemble strings patches, that we can find in Gold XP or Platinum XP, so I've used some time experimenting with what we have in this great and flexible library. The results were really surprising, and actually, there's almost an infinite number of combinations, we can use, it's up to your imagination. Not only you can prepair your own huge sounding combos. In many different ways you can do it even better than in Symphobia.
How? It's very simple, let me show you.
PART 1
Stacking
It's not a big discovery saying, that stacking multiple patches is the way to go. You can do that using Kontakt 2/3 but also Kompakt Player and PLAY (but with the last two – in a limited way). First thing we need to do is to imagine the kind of ensemble sound we want. Let's say, we want that Zimmerish marcatto strings ensemble. We want that low, aggresive sound with sharp attack. What we need to do is to find a set o patches of the same or similar articulation in all string sections.
Let's
say, we take:
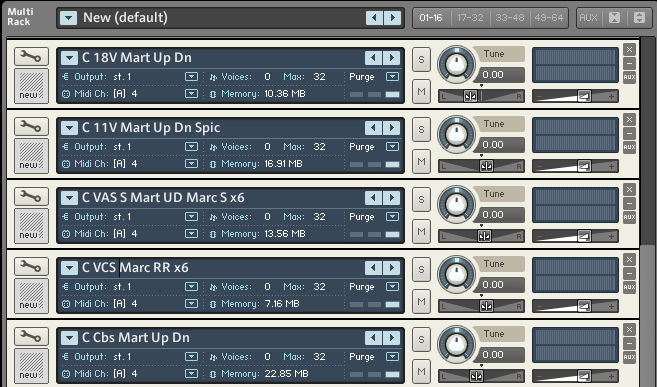
18V Mart Up Dn
11V Mart Up Dn Spic
VAS S Mart UD Marc S x6
VCS Marc RR x6
Cbs Mart Up Dn
and
assign them all to the same midi channel.
Of course, you can choose whatever patches you want, but here are the tips I found working very well:
pick patches of slightly different articulations in every section, they sound much more natural together – some are more lazy, some are very active, and the small timing differences are more than welcome.
pick patches with different number of repetition samples (RRx4 along with RRx3). This significantly improves repetition in our combos, multiplying number of sample combination in registers where multiple patches play at the same time. Say, we have 18V x2 (let's call it a and b) and 11V x3 (say, X Y and Z). When combined, we have 6 different versions – aX bY aZ bX aY and bZ. Of course, the repeating in one patch will still be audible, but slight changes in the other patch will make it less distinct.
Close mic choice is not necessary, but I found, they sound good and mix better in action or alike music than Full (Stage) and Surround mics. Their sound is also much sharper.
If you use Close mics, then fix the panning of each section. It also sounds cool if you put instruments that play in the same register in the opposite point in panorama. For example: 18V – to 30L (Left), 11V – 15R (Right), VA in the center, VC - 15R, CB – 15L. Also, if you move them closer to the center, than original, they will sound much more powerfull together.
Ok, once we are done with loading all the patches, we can assign a midi track and check how it all sounds.
Not bad?
If you followed with Close mics, try this:
Assign all patches to the same stereo output in Kontakt/Kompakt/Play (they load like this by default anyway) and EQ it a bit, I did it this way, for less mud and more distinct sound:
And to make it all blend together – a touch of reverb. I used Roomverb from Cubase 4 with Drums Medium Snare preset. It ads some nice mids blending.
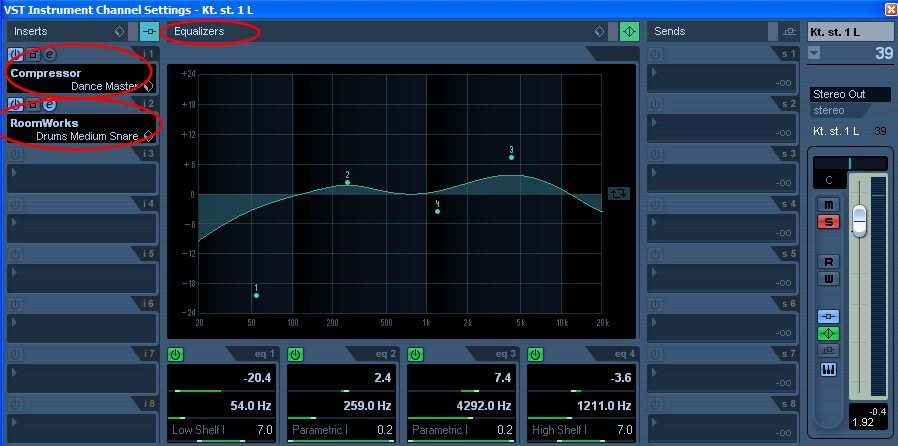
Compression might also make the sound much tighter, if we like.
PART 2
Fixed Ranges
But say, we want to play something between C2 and C4. In this register every single patch will play – as long as Violins and Violas will sound natural there, Cellos and especially Double Basses will not. But how to fix this issue?
One way of doing this, is to remap samples and remove them from unwanted registers. You can do this in Kontakt (but you can't in Kompakt or PLAY yet).
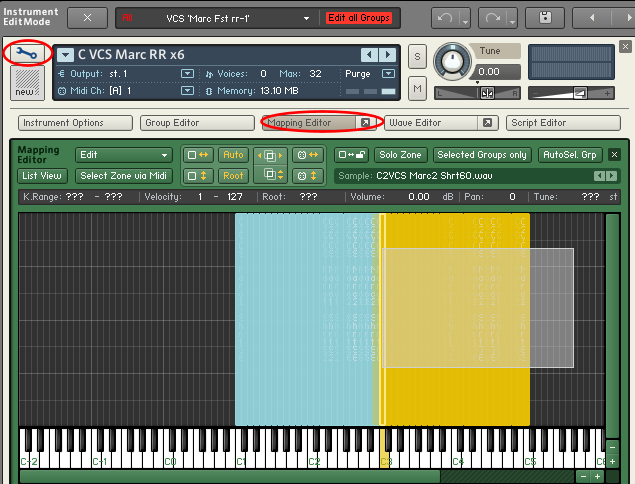
Open Kontakt, Click to unfold instrument details and go to mapping editor. Select the unwanted samples, right click and „delete zones”.
For example, we didn't want:
Cellos above C3
Violas above G3
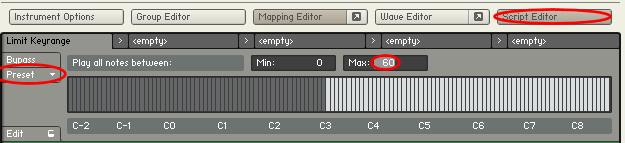
You can do this the other way, by using a script. Ufold instrument details, go to scrip editor, and load a preset: „Factory -> Performance -> Limit Keyrange”.
The values indicate: Min – the lowest available note, Max – the highest one. The dark gray area is the active area.
I wish this script didn't just disactivate these areas but also made some range of extremes (like 8 lowest notes) gradually lower in volume. So that we didn't just switch the instrument off, but made it gradually less audible as we go more and more into register, this instrument does not sound well in.
The difference between these two methods is that while the first one also releases some memory, because we are actually unloading samples the latter one will be more convenient in searching for the right setup – you can always change the range when necessary.
PART 3
More of the good stuff
Once we are done and satisfied with our strings, we can feed our sonic hunger even more ;).
Strings sound good alone, they are very useful in action scores, marcatos also sound very cool (especially in lower register) for „The-Opening-of-Spiderman-the-Movie-like” cello arpeggios. But let's say we are lazy on brass too.
Let's combine for example:
French Horn section: C 6FH Stac Long RR x3
Trombones: C 4TB Stac RR x3
and Solo Tuba: C STU Stac RR x3
Assign the three to the same midi channel. It's also cool to route them to the same stereo output as strings, so they got the same EQ and Reverb treating as Strings. You can of course EQ them separately on different channel, and treat with different Reverb than Strings – for example with higher predelay and reverb times.
Now this sounds ok alone, but let's see what's going on when we assign this brass combo to the same midi channel as strings. Check this out, especially below C3, and in high dynamics (and necessarily in D-minor! :P). Now we are talking!
So brass and strings. Enough? Sure not! What do you say for a bass piano?
Let's load Steiway D or any piano you prefer (actually, Concert Grand from K3 library is pretty nice for this), assign it to the same midi channel as Strings and Brass (not necessarily the same audio output). Now, we don't need the whole piano, don't we? Let's limit it to the lowest octave or so – for example everything below F1.
Cool :) But one more thing. Do we need the piano all the time? Or do we want it to play only at points, where the ensemble makes an accent? The latter solution might be cool, why not?
Unfold the instrument details for the piano, go to mapping editor again, and select all the lowest velocity layers and delete them („delete zones”). Now it works!
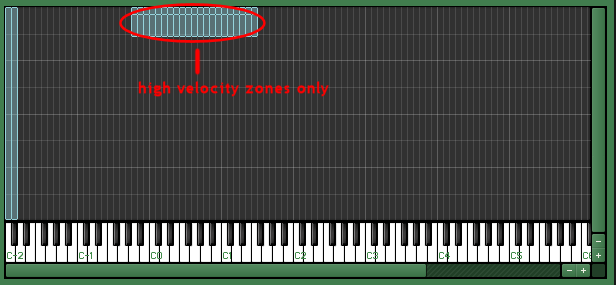
If you want to do the same with timpani hits, load it, remap the range of samples to the desired octave (c0-c2 for example), delete unwanted velocities, and it's ready.
You want an anvil? Why not! Load an anvil, remap it to the desired register – probably you'd need to copy and paste . You want a snare drum in the middle octave? Load it, remap, and duplicate the hits to a certain range and it's ready.
PART 4
Humanizing
It's not a surprise, that playing all the stacked sounds at the same time might result in somewhat robotic performance. The reason is that all the patches receive exactly the same midi command at exactly the same time. While working with instruments separately it's easy to fix by quantizing and randomizing velocity in Cubase (see tutorial 2 for details), with combos, we need to use built in Kontakt3 scripts. (Kompakt player and PLAY does not offer this option).
Let's go to an instrument in Kontakt, unfold instrument details and click on Script Editor. Let's load a preset - „Factory -> Performance -> Humanizer”. What we want is to delay each sound of all used patches by a random time, let's say, below 40ms. Let's set timing value to 40 (ms).
We'd also could use some variations in velocity. We can do that too – let's set Velocity value to, say 20.
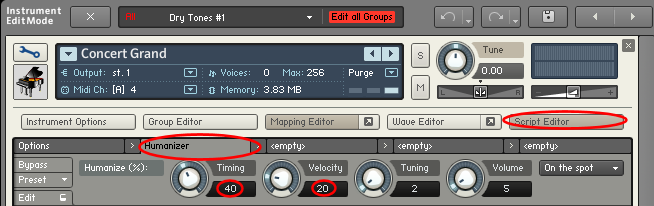
We can also randomize tuning and volume a bit, if we want. But I don't recommend overusing the first one ;).
We can now apply it to all (or a few, if you prefer) patches in a combo. The result is, that every patch now plays at slightly different time and velocity, which in most cases is highly desirable. The only thing about this method is, that this script uses random values, and produces different results every time.
Techniques shown in this tutorial may be used to achieve a full dxf sustained or legato string enseble, woodwinds, full orchestra or string quartet, it's all up to you. These are only basics, just a beginning of what we can do, feel free to experiment then.
This kind of combos might appear useless for complex orchestral writing, where instruments need to be treated in details separately. Under some circumstances however, they may become invaluable lifesavers. Especially under pressure of time.
Have fun!
Piotr Musiał
Download a PDF version: