
Quick tips on Symphonic Choirs: Shouts
by Piotr Musiał
Note: This tutorial was made using Cubase 4 Studio and Kontakt 3
Hi. My name is Piotr Musiał and I welcome You to my next tutorial!
This time, as promissed, a quick tips on setting up a pretty helpful and quickly accessible shouts multi for Symphonic Choirs. It can be done in either Kompakt, Kontakt or in newest, PLAY version of Symphonic Choirs. Some more advanced features at the moment can be only done with Kontakt and it's built in scripts, but I hope, with PLAY Pro, you'll be able to do it just as easly.
Firstly – let's think, what do we want? Would we like do be able to work with shouts in Wordbuilder, and put the words there?
I hear some of you saying - „Oh, yeah!”. But, let me tell you something. Firstly – gettings SC to shout using pitched consonants such as „n”, „r”, „z” etc is possible, but the results are really bad :) - since the character of these pitched consonants is pretty different that the shouts, so they don't really fit together that well. Notice, I'm still not saying this is impossible – I'd like someone to prove me I'm wrong. Wanna try?
Secondly, once we quit thinking of pitched consonants, and full blown shout lyrics right out of a latin dictionary, we realize, that not much we have left – it's only shouts fx and non-pitched consonants. Shouldn't be difficult to fit into a keyboard range, right?
STEP 1
LOADING PATCHES
I think there's no need for a in depth tutorial about this, so let's start by picking the right articulations.
For
example, let's take C mics, and Basses – we need to load these:
Instruments\Basses\C
BASS\C BASS fx\C BASS shouts.nki
Instruments\Basses\C
BASS\C BASS cons\C BASS non-pitched.nki
(btw, why there are no „pros” folders in this library?;))
You could of course set them to different midi channels, and record midi for both of them separately. End of tutorial, have fun ;).
No seriously, let's set them both to midi channel 1.
STEP 2
REARRANGING KEYS
As soon as you try playing them now, you'll realize, that both play on the same keys, which is not cool.
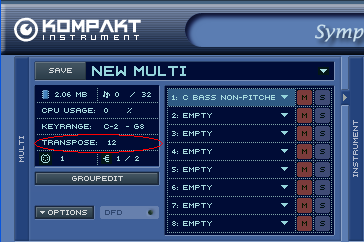
Easiest thing to do is to transpose of the patches – I took consonants. In all three virtual instruments, it's very easy to do – each instruments has it's Transpose settings. We want to move the range 8va lower, so we have to set transpose to +12 (this may sound nonsense at first, but this is how it works – we are transposing midi, that's comming to the sample player, not moving the original mapping):
KOMPAKT:
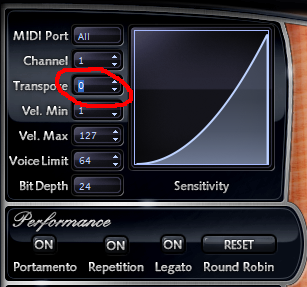
PLAY (it's the EWQLSO interface):
and
Kontakt:
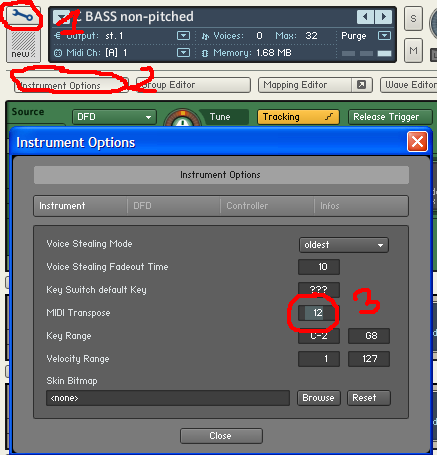
Ok, now, the patches are arranged in such way, we can simply use left hand to play consonants, and right hand to play shouts.
But at first, it doesn't seem to fit together that well.
STEP 3
RELEASE TIME & VOLUME BALANCE
Notice, that after releasing the key the consonants stay a while longer. This is a bit unconvinient, because, since when a man can do „shhhh” and shout „A!” in the same time?
The easiest fix for this is to cut down the release time. By default – it's probably around half a second – let's cut that time to a half, or even less, let's say – 200ms.
Each player has it's own AHDSR section, you should find it easly (the most hidden one is actually in Kontakt – it's in the Modulation section of instrument).
Now, sounds a bit better, right? Though, the consonants still are a bit off – let's adjust the volume of this patch – like, even +6dB in comparison to shouts. Yeah, better.
We're basically done, the next step is to actually learn how to use it, record and listen, rerecord or readjust settings. But let's see what else we can do
STEP 4
MORE STUFF
YOU MAY WANT TO TRY
Once
we've setup our basic shout multi, we may try a couple more tricks:
All
right, basses alone sound OK, but sometimes we
want more (not that we always need more, but
it's just a human thing, you know). First natural thing in this case
is actually the best one – let's add to the multi C mics of
Tenors and do all the previous steps. Assign them to midi channel 1.
However notice, that boys choirs have one more shout sample mapped in the middle (it's D4), so they won't quite work together with other voices, unless you move the sample above the original range and remap the rest accordingly.
OK. We've got more.
We want them to shout not that perfectly together and all in the same velocity and stuff. We want them to shout more like human. Sure – sometimes when you have more than one section, with Kontakt 3 - you may want to try this:
Go
to one of the patches, click to open Script Editor section. From the
preset menu in the first slot, add „factory -> performance
-> humanizer”. Do it for all patches in
the multi. Now, I've described how to use this script in Tutorial 5,
Part 4. Once thing, that I didn't mention there, is that with what we
want to do now, we could use some tuning varieties, each time we
press the same key – knob signed „tuning” is the
one you are looking for. Adjust the settings by ear. Best –
differently for each patch.
More
mic positions – you can always expand
the multi with another mic position. For example, if you have F mic
multi – you might want to add consonants from the C mics. F &
S mics are a bit more difficult to setup – since consanants F
and S also have Release trails – but it works with them just as
well.
Improving
sound – I think that there's a couple of things you can do to improve the
sound, and make it sound even more realistic. Firstly – adding
reverb on the multi is the most basic and effective thing you could
do.
Secondly
– you might have not noticed this yet, but I think that
generally, non-pitched consonants sound a bit too wide in stereo so
they don't stick with the shouts that well. What I like to do, is to
simply add a Stereo Modeler as an insert for this patch in Kontakt,
and set the „Spread” knob to a negative value (narrowing
the stereo image) or even to zero – mono. My opinion is, that
this sounds waaaay better.
You
can also add a Low-Pass filter to sort of change character of the
sound from softer to harder, when played at different velocities or
using modwheel, which is often very handy, when you work on samples,
that have only one velocity layer, or don't use any sample
crossfading. If you know, how to do this you are very lucky! If you
don't... you'll know after reading my next tutorial :).
Have
fun!
Piotr Musiał
Download a PDF version: